Yet Another Golang Ray Tracer - Episode 1
Intro
In this blog series I will be creating a CPU ray tracer (eventually a path tracer) from scratch.
Main idea of a ray tracer is to send rays from the camera for each pixel into the scene and calculate that pixel's color value from the properties of the objects that the ray hits. With ray tracing we can generate photorealistic images, usually better than the ones we can generate with the forward rendering techniques. The catch is, it is slow. Consider a measly 1024x1024 image, there are 1,048,576 pixels we need to color. In other words we need to cast at least ~1 million rays into the scene just to get a really basic image (maybe on par with a kindergarten watercolor). Generating cool looking images (e.g. Blender Splashes) may take several hours to days.
 |
| Blender 2.79 - Splash image |
I chose to create this ray tracer in Go because I have been wanting to try it out. I believe that with a project of this size I will get quite familiar with it. Moreover I know that parallelizing work is quite easy in Go, and since ray tracing can be parallelized quite well I thought they would go well together. In the current state my ray tracer can:
- Parse an xml containing the scene data and construct a scene
- Render spheres and triangles (and also triangle meshes)
- Render object shadows
- Compute ambient, diffuse and specular shading (albeit quite simple)
- Render multiple images from different cameras in the scene
Process
First I had to parse the xml. In Go this is quite easy as it almost automatically parses the xml and maps its contents into defined structs.After creating the scene from the xml file, I implemented sphere and triangle intersections. At this point I had no support for materials so I just colored the pixel white if the ray hit something.
 |
| simple.png - First render |
After intersections I implemented materials. Each object in the scene has a material and each material has an ambient, diffuse and specular reluctance levels. At this stage though, specular reluctance didn't matter. I just picked the materials' diffuse reluctance and used it as the color. I also added the ambient color to everything.
 | |
| cornellbox.png - Diffuse and Ambient colors are added |
After dealing with the basic colors, I implemented the lights. Currently ray tracer only supports point lights, however in the future I plan to add support for area lights, object lights, spot lights and directional lights. After adding lights I also fixed my color calculations to account for the light attenuation and angle. Things were starting to look better. A bit unnatural maybe.
 |
| cornellbox.png - Added Pointlights. Without shadows it seems a bit unnatural |
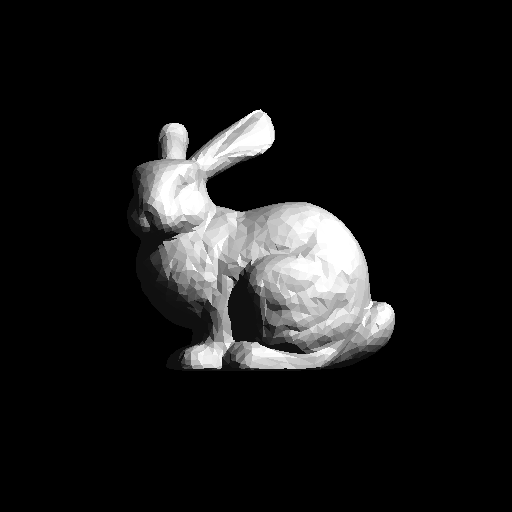
Then came the shadows! I had the most problem with the shadows and maybe spent hours following the rays into the scene while explaining everything to my rubber duck. I had two serious bugs. First one was relatively easy to fix. While parsing the scene xml file if there was no tags to specify epsilon values, my epsilon values would become 0. This caused a lot of surface acne, and I mean A LOT.
 | |
| bunny.png - Surface acne caused by wrong epsilon values |
After fixing the acne problem, there were still some triangles which are not correctly shaded. After debugging for almost a full day, I eventually found the problem. While checking for intersections, I wasn't looking for the closest intersection. This caused my rays to have wrong intersection points, and normals resulting in me casting the shadow rays from the back faces of some triangles. This in turn caused the mesh to self shadow and I ended up with random black triangles scattered thorough the image.
 |
| bunny.png - Rays intersect with the backside of the bunny first causing black triangles. |
Feeling relieved after fixing the previous problem I breezed through adding the specualar shading. It boiled down to some vector arithmetic.
In the end, I decided to give a go to the goroutines of Go. Goroutines are lightweight threads managed by the Go runtime and using them is actually quite simple. You just need to prepend the function call with the **go** keyword and the Go runtime processes that function in a separate thread. In my computer maximum number of threads that Go will spawn is 16, but I don't know how many it spawned while rendering the below images.
Here are the final renders and their timings:
 | ||
| bunny.png - Single Thread Render Time: 44.80s / Max.16 Thread Render Time: 4.14s |
 |
| spheres.png - Single Thread Render Time: 215.07ms / Max.16 Thread Render Time: 59.00ms |
 |
| cornellbox.png - Single Thread Render Time: 926.78ms / Max.16 Thread Render Time: 567.13ms |
 |
| simple.png - Single Thread Render Time: 143.03ms / Max.16 Thread Render Time: 73.02ms |
 |
| scienceTree.png - Single Thread Render Time: 1m39.45s / Max.16 Thread Render Time: 9.54s |
I also created a gif from the images rendered at each major step.
 |
| spheres.png - Spheres at each significant step of the process. |
Finally I leave you with a rainbow bunny! You can find the code at hbostann/yagrt
| RaInBOwBuNnY |
I bid thee farewell, ...for now
Computer Specs
CPU: AMD Ryzen 1700 @ 3.74 GHzGPU: Nvidia GeForce GTX 1080
RAM: 16 GB
OS: Windows 10 64-bit
Comments
Post a Comment